
Why Your Gold Jewellery Looks Green in Photos (Plus 3 Other Common Photography Mistakes)
- Jack Pickerill
- Jan 6
- 5 min read
Jewellery and watch photography is tricky - there's no getting around it. But after years of photographing luxury timepieces and fine jewellery, I've noticed the same four mistakes come up again and again, even with experienced photographers. The thing is, these aren't obvious problems. Your images might look "fine" at first glance, but something just feels off. Maybe the gold doesn't look quite right, or the metal finish seems flat, or there are distracting reflections you didn't notice when shooting. I'm going to walk you through the four most common mistakes I see in jewellery photography - and more importantly, show you exactly how to fix them.
Jewellery and watch photography is tricky - there’s no getting around it. But after years photographing and retouching luxury timepieces and jewellery, I see the the same mistakes come up time and time again, even with experienced photographers.
No matter what equipment you are shooting with, be it an iphone 6 or a state of the art phase one, avoiding these mistakes and following the below tips will help to elevate your current jewellery and watch photography.
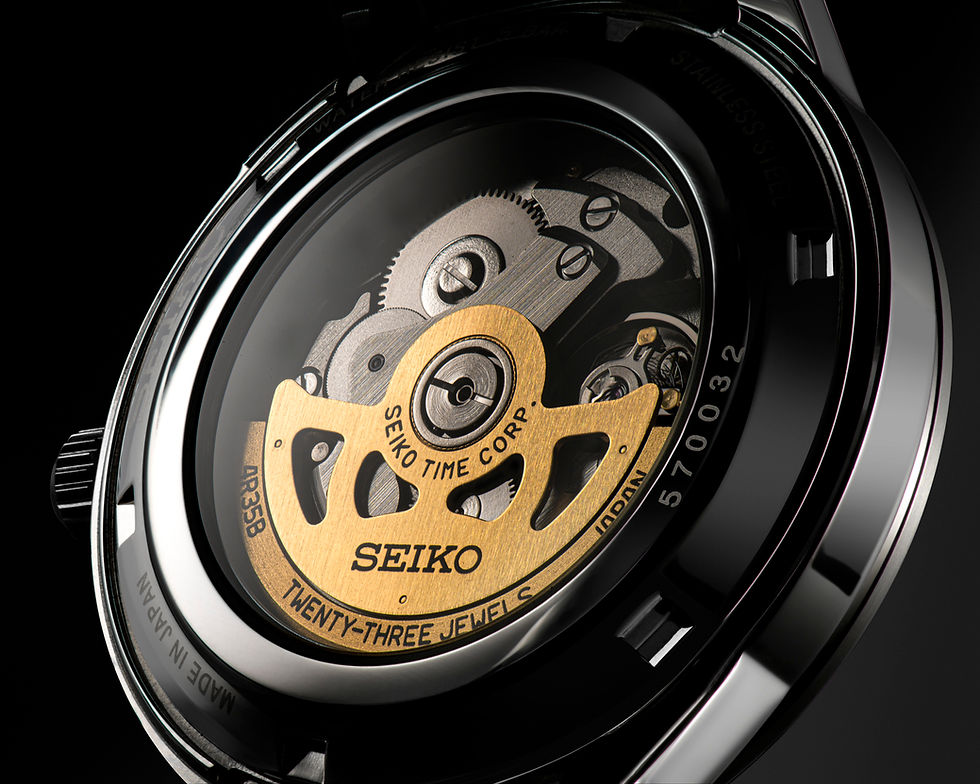
1.Your gold isn’t gold (because your iphone is guessing the colour)
Phone cameras rely heavily on camera computing and choose the right settings for each shot automatically. Unfortunately as of 2026 the auto white balance in phones just isn’t consistent enough for accurate colour when photographing watches and jewellery. Thats why when you shoot a silver watch it often looks more of an icy blue, and your gold jewellery can drift towards green or a muddy yellow.
This happens because all of the light sources coming into your images are slightly different colours - your phone just doesn’t know which one is correct and so it tries to match your image to cater to all of them at once.
Follow these tips to maximise colour consistency:
Shooting with sunlight (both outdoor or window light) as your main light source
You need to either turn off every other light in the room, or ensure that your other lights are calibrated to match the daylight you’re in.
Shooting with artificial light (LED or flashes)
You need to ensure that
1.All of your light have the same colour temperature
2.All other lights in the room are off - When you turn your lighting off, your image should be completely black.
When all of your lighting is consistent, photographers can easily calibrate images in post production software (Capture One, Lightroom or photoshop) and tell our camera which colours are correct using a colour checker passport.
If you are using a phone for photography - now that your light is consistent, it’s easy to get accurate enough results by adjusting your colour temperature in pretty much any photo editing app - just adjust it warmer or colour until your product looks the correct colour without any casts, and then match every other image for consistency.

2.Your reflections are mess (and we can see you in the reflection)
If you’ve already had your first failed attempt with your jewellery photography, I’m sure you have discovered that every chrome silver or gold surface acts as a mirror and up close reveals everything reflected into it. If you’re not careful this does include your hands, your phone, the table and everything on it.
The goal here is to shape these reflections into pleasing shapes that are abstract and random enough so that they don’t make the product appear dirty or damaged, but accentuate the natural shape and finish of the piece.
This can be done with the strategic placement of various pieces of silver/gold card, mirrors and my personal favourite - opaque curved plexiglass.
These should be placed close enough to your products that they cover as much of the reflection as possible. If you are using artificial light then shoot through your opaque materials for a premium look with great contrast.

3.Stainless steel looks grey (and we can’t tell what finish the watch is)

This is a common mistake that I see happen when shooting in light tents or when using a soft light source too close to the watch.
This is essentially the opposite problem of mistake number 2.
Here the reflections have been controlled too much, to the point where all we can is a flat colour in what should be a reflective metal. The fix here is move your diffusion material back and place your lighting as an 45 degree angle to the product so there is some graduation of light that reveals the products true finish. It can also help to place some black card strategically around the product in order to intersect the diffusion and create a reflective effect in the products reflection.
4.Over-editing or unrealistic retouching
If you’re editing your images follow my retouching rules:
Is the product is gloss or matte - can you easily tell from the image?
As with the above, pay attention to the tones of the image - a chrome watch can easily appear flat grey with incorrect editing and lighting techniques. For a chrome watch to appear chrome, the finish needs the right amount of blacks and whites to show the watches reflectivity. Be wary of amateur retouchers that go way too far in the pursuit of perfection, removing every lines in the products reflection until the original finish is unrecognisable.
Remove anything temporary
Because we’re often shooting such small items in jewellery photography, dust can appear much larger in our final image and make the product appear dirty, damaged and generally undesirable. Follow this real, if you could have wiped it off, remove it in photoshop.
Dodgy cutouts
Be wary of Ai clipping path software. I don’t think that anybody enjoys the drudgery of cutting out products with the pen tool - but as of 2026, the only reliable way to get a clean cutout in jewellery photography is with the pen tool in photoshop.
And there you have it, Dash. The four mistakes that might be holding back your jewellery and watch photography.
None of these are particularly complicated once you know what you're looking for. It's really about understanding how your camera interprets colour, learning to control reflections rather than eliminate them and knowing when your retouching has gone too far.
Get these fundamentals right and you'll see an immediate improvement in how professional your shots look. Your metals will actually look like the right finish and the colour of the piece you are shooting won’t shock the customer when they actually arrive!


Comments